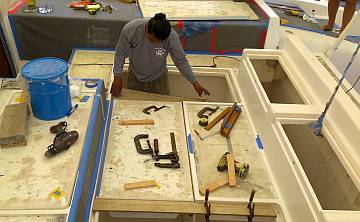
Houa takes over the cockpit, planning where his teak will go
87 Start Cockpit Teak
Summary: A good week, despite all the rain. This week we:
|
 Houa takes over the cockpit, planning where his teak will go |
Monday, July 1:
A good start to the week, but by afternoon the rainy season had returned, so we shall see how tomorrow goes.
The cockpit teak project is now officially underway! Houa began the day trying to install the 6 big stainless steel hinges for our 3 big cockpit lockers. These hinges straddle the gelcoat rims and Houa wanted "to check that everything is good." Unfortunately, the old holes and the refurbished hinges don't line up. Rather frustrating. Jon realized that all 3 cockpit locker hatches had been moved and rotated randomly, so there was NO way the hinges were going to match from hatch to gelcoat rim. So Houa will carry on with the teak laying and we'll fit hinges, drilling new holes if need be, when the teak is done.
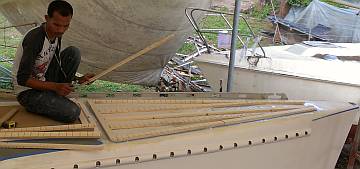 Newly shorn Baw builds a wood platform for the water jugs |
Once that was figured out, Houa spent the rest of the day in the cockpit with all his measuring devices, straight edges, superglue, right angle tools, clamps, and bits of teak and other wood. He very meticulously found and marked dead center of the cockpit and the center hatch. Then he centered each of the 3 hatches exactly in their openings. To hold them in place while he lays teak, he super‑glued bits of bracing wood to the edges (on top of blue tape so as not to disturb the gelcoat).
Baw and his team of 2 (Pla was absent today) worked on getting the pieces of wood ready for the next nonskid areas to be glued down - the port bow, under the 2 side windows, and under the galley window. But once that was done, Baw asked if it was OK to spray gelcoat. Absolutely! He and his team cleaned up and then taped the edges of the 2 aft seats, and the 2 new diesel hatches, all of which have their nonskid but need their edges sprayed again. He also taped and cleaned the 2 new pieces of interior hatch trim that Houa made us, which also need gelcoat.
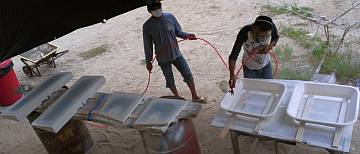 Darth Baw sprays gelcoat on the interior hatch trim |
By late afternoon (even with threatening rain!) Baw was spraying with his new 1.8mm nozzle spray gun. With the small gun he can concentrate gelcoat on very small areas, with really good precision, but he has to thin the gelcoat down with mono‑styrene, which means increasing the catalyst. As we left the yard at 5pm, he was putting little repair "dit‑dots" of gelcoat into any craters or holes from his spray.
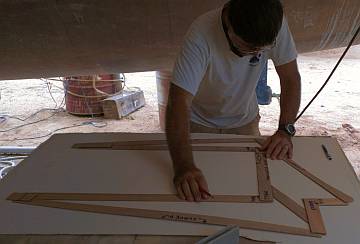 Laying out a swim-platform template on a nonskid scrap |
Mike dropped by and we discussed the bimini and whether it will be stiff enough to hold nonskid panels. If there is too much flexing, the panels could delaminate, and then it would be a mess. The alternative, since we don't see the top of the bimini very often, is to use polyurethane "sand" as nonskid, and apply them with either gelcoat or 2 part polyurethane paint. The jury is still out on this, but we have to test the bimini's flexing tomorrow morning so that Mike will know whether or not to make 2 more sheets of nonskid.
Having spent Sunday doing Nyalic, Sue was inspired to continue the project. To that end, she polished and hand sanded a big stretch of the boom until the rain sent her back under cover.
Jon finished the last of the templates today. He finalized the template for the new little patches of nonskid that will go next to the engine hatches, on the "walls" of the sugar‑scoops. This is an area we step on quite often, but have never had nonskid before. It should feel much safer, especially in the wet! It was tricky though, as the hull shape dictated a fairly narrow piece, but common sense said to make it wider. Common sense won. We wonder how long it will take us to "not see" the diverging line of the nonskid and the hull slope. His other template was the little aft‑most piece of the swim platform on starboard, which is so close in shape to port that we will probably just duplicate it.
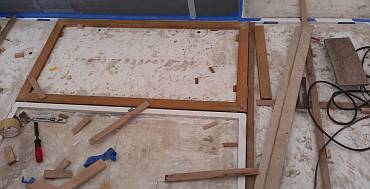 Houa's teak frame around the edge of the center cockpit hatch |
Mike still has not had time to cut out several of our smaller pieces of nonskid, or even the 2 large‑ish pieces that go on the swim platforms. But we now have all the nonskid scraps and off‑cuts, so Jon began laying out the templates on those pieces of nonskid. Sort of like a tailor laying out his patterns on cloth and trying to be efficient about it, as we don't have any to waste. Care had to be taken to get the diamond pattern lined up correctly to the template. With luck, we'll have enough scrap for the last 18(!) nonskid pieces.
Tuesday, July 2:
Heavy clouds and drenching rain, but way cooler temperatures, so a nice working day.
Even though we were short‑handed with Pla and Lek out and Baw leaving at mid‑day to get his back
seen to, things did move ahead.
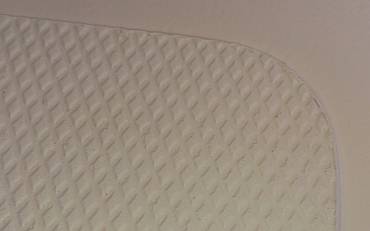 The nonskid-to-gelcoat interface looks pretty good |
Mike worried that the the nonskid might crack off the bimini when the bimini flexed from people climbing on it. So our first order of business was testing the flexibility of the bimini. We raised it off its table support by placing a wooden table under the entire back edge (just like it will be supported by the targa bar) and put a set of empty 20 liter gelcoat cans under each forward corner to simulate the effect of "legs" holding it up. Then Jon measured while Sue and Baw got to sit on the bimini. Felt a bit like being weighed in public. Yes, it flexed, but the 2cm it dropped in the middle translates to the skin stretching and compressing only 1:10,000! Baw and Jon are pretty sure there will be no problem so we asked Mike to go ahead and make the 3 sheets of nonskid that will be necessary for the bimini.
Baw and Heru concentrated on sanding the 6 pieces that were gelcoated yesterday. These are the first pieces to get their final gelcoat, so we're interested to see how it looks around the nonskid. They cleaned up the gelcoat overspray from the edges of nonskid, and then began the polishing exercise to smooth the gelcoat around the nonskid. By the end of the day they'd finished everything up through 400 grit. Tomorrow they'll fill any small holes and then continue with ever finer grits.
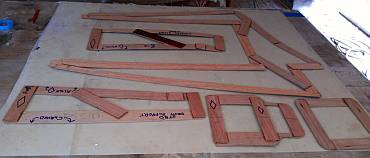 Laying out templates on the back of a sheet of nonskid |
Jon worked on laying out more nonskid templates on the leftover bits of nonskid scrap, trying to be as efficient as possible so we don't end up not having enough nonskid left. He finished both swim platforms (4 pieces on each side because of the ladders) as well as 2 of the 8 louver pieces and one of the 2 new pieces that go at the base of the vertical davit supports. So he's now laid out 11 of the 18 pieces. He's planning to lay them all out before he starts cutting them out (although he did go buy some cutting disks today).
Houa spent the day in the cockpit playing with his teak pieces. Just before the heavens opened at 5pm he called Jon up for photos. He had a teak frame around the center hatch, something we've not had before. He's planning to put frames around all 8 of the large teak area. Should look very nice! With that first one calculated and created, things should move faster now.
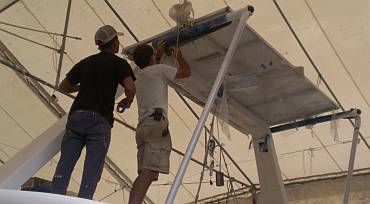 Moving the solar panels from the targa-bar aft to the davits |
Sue played with 400 grit sand paper on the boom, brightening it up, but left at mid‑day to get some accounting stuff done at the room.
The heavens opened at 5pm, just as Jon was getting ready to leave. Torrential, with wind and lightning and all the normal carryings on of a good squall. <sigh> By 5:30 it was down to a sprinkle so Jon quickly scootered the 2km back to the apartment. Arrived drenched...
Wednesday, July 3:
Middle of the week and it feels like we're still ramping up. Baw was still in the hospital
with back problems, but everyone else was on board. The weather forecast said it would rain
all day, but in fact it was a lovely day with only a short shower around 4pm.
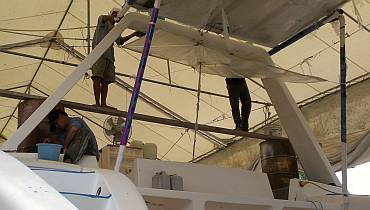 Pla sanding the cockpit while Lek & Heru sand the targa-bar |
Without Baw there to direct his team, it fell to Jon and Sue to give the guys direction. So we turned our thoughts upwards, to the Targa‑Bar. Jon and Heru wrapped the newly powder‑coated davit support poles and then slid the solar panels aft, off of the targa bar and onto the davit supports. Always a bit nerve‑wracking to see those expensive panels moving around but it went off without a hitch. Then the guys handed up 2 big empty 55 gallon (200 liter) drums (yuck, the rust!) and Jon hefted a couple big planks up to the men for scaffolding. Houa was amenable to them working there, as long as no water dripped onto his teak area, so they built a clever "dam wall" of plastic, and their wet sanding dripped down onto the ground behind Ocelot. Lek and Heru appointed themselves as the targa‑bar sanders. They worked with 240 grit on the untouched gelcoat, and by day's end were almost finished with 400 grit, at least on the top, underneath and aft wall.
Pla, meanwhile did some gelcoat repairs with a little stick to the new interior hatch trim piecess, but he didn't get to the hatches that were sanded yesterday. Instead he started sanding a small vertical wall on the port side of the cockpit, getting it sanded up to 1200 grit.
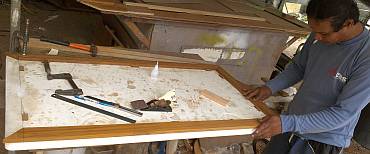 Houa creating the teak borders for the big cockpit hatches |
Houa removed the 3 big hatches from the cockpit and worked on them all day in his workshop. He and Jon had a discussion about how to join the mitered corners of the teak frames around each hatch - whether to glue them with epoxy, or to have a Sika‑filled mitered joint. "Up to you," said Mr. Houa, but we couldn't get an answer from him as to which would last longer. He seemed to think that we might have separation problems in a few years if we just epoxied the teak corners together, but the old teak floors were epoxy‑mitered and lasted 17 years. We prefer the look of not having black Sika marking the mitered joint, but we're more interested in longevity.
Houa doesn't have a commercial miter box, but instead made himself a miter template into which he slides a piece of teak, tightly, and the end can be sanded to perfection. By day's end, he had all three of the hatch frames mitered and epoxied together. Tomorrow he'll mount them to the hatches with Sika! Woot!
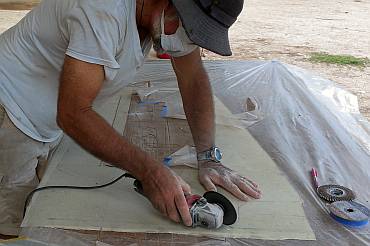 Cutting out a complicated nonskid piece with a cutting disk |
The big advance of the day was with the nonskid. Jon finished laying out the remaining 7 pieces, finding the diamond alignment line, transferring that to the back of the nonskid sheet, aligning the template with the line, and then using the template to draw on the back of the nonskid sheet where it needs to be cut. Once all 18 pieces had been laid out, he started cutting them out of the nonskid (Mike is cutting the 2 remaining pieces for the cabin‑top, and he still has to make the 3 full sheets for the bimini).
Cutting out the nonskid panels is something Mike (AME) has contracted for, but, as has happened a lot on this deck/nonskid job, Mike's spread a bit thin and we're having to do more of the work. This is actually fine with us, as it should reduce the final contract price. Mike has lots more experience and would have cut them faster, but for him it's a job while for Jon it's a labor of love.
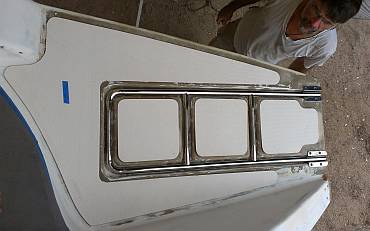 Swim platform with nonskid - will look better after gelcoat spray |
Jon caught on quickly, using a 4" (10cm) medium thick cutting disk on the grinder, cutting on top of a plywood‑covered table. He setup the big fan to blow the fiberglass dust away from the boat, but it was still a dusty job. The rectangular louver pieces went fairly quickly (4‑5 minutes each) but the weirdly‑shaped swim platforms took longer, especially as they had tricky inside corners to cut.
After cutting each piece, Jon used a sanding‑board to smooth the edges. On the interior curves he used a sandpaper wheel on a drill to smooth the radius. By the end of the day, all 18 pieces were cut out, but 5 still needed their edges smoothed (and Baw will, no doubt, want to check their shapes and smooth them some more, as he's got more of an artist's eye than Jon). Then they'll get cleaned, the edges taped, and covered in plastic so they're ready to glue down to the deck.
Cutting the swim‑platform pieces meant that we could finally see what the swim‑platform is going to look like. We put a ladder and its hinges into the grooves and just laid the nonskid down where it will go. Voila! It actually looks bigger because the ladder fills the grooves so the whole platform looks flatter. With some gelcoat between the pieces of nonskid, it should look really nice.
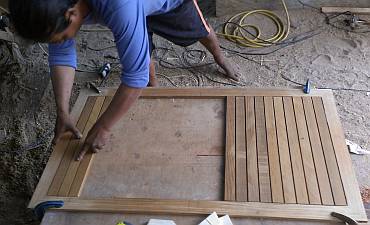 Houa filling his teak frame for a cockpit hatch with teak strips |
Sue got well acquainted with the starboard side of the boom, sanding it with 400 grit sandpaper and water, finding where the scratches were still too deep, then re‑grinding with the polishing wheel. It took a few passes to get it all cleaned up, but given that she was working on a vertical (not horizontal) surface and the light was bad, she couldn't see the scratches until she swiped the wet sandpaper over the aluminum. There's still lots of fiddly bits to clean up, and the hand‑rail as well, but it's well on its way to being ready for Nyalic. Her rib still hurts, but this was her longest day at work in a few weeks. Home for a shower and a beer!
Thursday, July 4:
Another wet day. It rained pretty much all day but at least we had all our workers - well,
except Sue, who spent the day doing finances in the apartment. Not sure where all this rain is
coming from. There's a tropical storm that's going to form in the South Indian in a few days,
but that's hundreds of miles away with clear skies between us and it. Perhaps it's just the
rainy season...
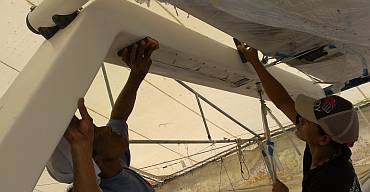 Lek and Heru polishing the top of the targa-bar |
The moist conditions meant no gelcoating, no epoxy work, and even the primer for Sikaflex doesn't like humidity, so Houa couldn't stick down any of his teak. But the guys still found things to do.
Houa probably had the most fun. He finished the 3 outer teak frames for the big cockpit hatches and started cutting teak strips for the interior. The Sika needs to be 2mm (.08") thick under the teak, so Jon asked Houa if he was going to use a spacer so he didn't push the Sika out from under the teak. No, he apparently knows how hard to push down on the teak and still maintain the correct thickness of Sika. OK...
Lek and Heru spent the day sanding the top of the targa‑bar. When they finished with the 400 grit they marked all of the places where the gelcoat had a hole or needed building up. Heru used a little stick to fill the tiny holes, leaving little blobs of gelcoat inside his penciled circles. Lek found a couple areas that needed more attention, so he mixed up a larger (tiny) batch and smeared it on around one of the access panels. Tomorrow they'll continue with their sanding.
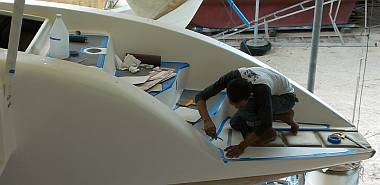 Baw positioning nonskid on the starboard sugar-scoop |
Jon finished trimming and sanding the remaining nonskid that he'd cut out yesterday. Then, with the air so cool he decided to look into some of the rewiring projects he's been wanting to tackle. This will require rearranging much of the stuff that's currently being stored in Ocelot's salon, as he'll need to get into many small areas to run the wires.
Baw started out working in the cockpit but soon got more interested in all the nonskid that Jon cut out recently. He positioned the 5 remaining pieces on the starboard sugar‑scoop, with tape around the nonskid and little blocks super-glued to the tape so we can put the nonskid back exactly. Then he collected several small hatches and things that need to be sprayed with gelcoat and made sure they were ready for spraying. He even hung several of them up. Unfortunately, it looks like rain again tomorrow, so the spray may have to be delayed again.
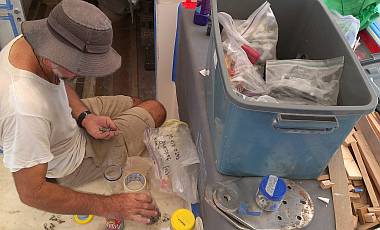 Sorting through stuff from the salon. Too ... Much ... Stuff! |
Pla started out polishing the new pieces of interior hatch trim, but either the gelcoat was too thin or he sanded to hard because he sanded through to the fiberglass. It happened in enough places that Baw re‑taped the trim and will re‑spray both pieces when he next shoots gelcoat. Then Pla started sanding the grab‑rails on the boom, as Sue had instructed him.
Friday, July 5:
Yay! Sunshine at last! And a quietly good day on Ocelot!
With the rain gone and sunny skies overhead, the men spent the morning getting ready for a gelcoat spray of more hatches, both those with nonskid and those without. Everything got laid out on plastic covered tables, surrounding structures were masked off, and the interior hatches (with finger holes) hung by the scaffolding with care. With Lek as chemist/assistant and Heru as "keep the air hose out of trouble" man, Darth Baw got a couple more layers of fresh gelcoat on all 10 hatches and the new interior trim pieces for the forward hatches. The gelcoat cured hard by mid‑afternoon. Then Baw worked on gently sanding the new gelcoat, taking care to peel back the overspray from on top of the nonskid.
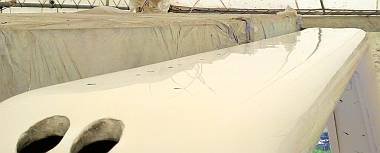 Nice reflections in the polished top of the targa-bar |
Lek, Pla and Heru continued working on the upper targa bar, and we were thrilled when, at 5pm, they announced it finished. Quite the shiny structure. They don't want to machine polish it, as that would involve wax and we don't want anything like that near the cockpit while Houa is working on the teak.
Jon and Sue spent several hours sorting through (and making a new list of) the boat bits that are stored inside Ocelot's salon. Since Jon wants to get in there to lay some new wires, we need to clear it out, so we moved it all to our storage unit. Also, we've asked Baw if he has any friends who can varnish, and we hope to have some new workers soon. The interior needs a major clean up before anyone can sand or varnish inside, but we're ready to start varnishing.
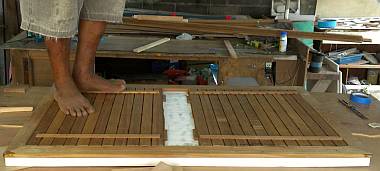 Houa gluing down pre-cut teak strips on a cockpit hatch |
The landmark event happened over in Houa's workshop. With the sun out, Houa was able to bond the teak to the cockpit hatches. First he sanded and cleaned the rims of the hatches where the frames will go. Then brushed on Sikaflex Primer to both the hatch surface and the teak frame. After waiting for it to dry (just a few minutes in our heat) he loaded the big Sika "sausage" gun. Pretty exciting to see the brown bonding Sika splooge out onto the hatch rim and then onto the teak itself. He used a toothed plastic spatula to spread the Sika, then lowered the frame onto the hatch! YAY! Our first teak laid!
Houa was on a roll today. He got a second frame mounted. Then he used the un‑mounted frame to build the interior teak boards to the right length. They've already been cut to the proper width, and had their edges routered out 2mm wide and 6mm deep. After half the boards were sanded to the right length and laid in side‑by‑side, he did something surprising. He super‑glued them together in a few spots on each piece! What he had then was a 5‑6 board wide rectangle that could be placed inside the frame in one movement. Again he sanded and cleaned the hatch surface, then applied primer and brown bonding Sika and VOILA! We had the first real semblance of a teak deck!
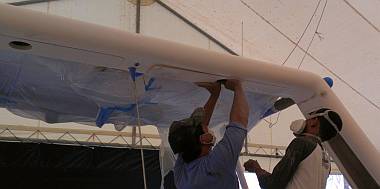 Pla and Baw checking the fit on a targa-bar access panel |
Houa was the first to walk on our new deck! We caught him walking barefoot on the boards to evenly press them to the hatch. After that he used more conventional long boards and clamps to hold the new teak in place!
Saturday, July 6:
We have to think of this as The Great Targa Bar Day, because that's where most of the energy went.
But other things happened as well....
Our Team Of 4 spent the day wet sanding the Targa Bar sides to make them smooth and shiny. This is a project that has slipped, and slipped, and slipped in importance for months. Finally, it's gotten the attention it deserves! Along with making the gelcoat all gorgeous, Baw and Pla worked on trying to get the 6 access panels in the targa bar to fit. Unfortunately, enough gelcoat has been sprayed on that it has messed up the size of the access panel recesses. So the covers don't fit very well. No worries. A little time with the sander and the grinder, and lots of fitting and playing around, and they'll get the access panels to fit just fine!
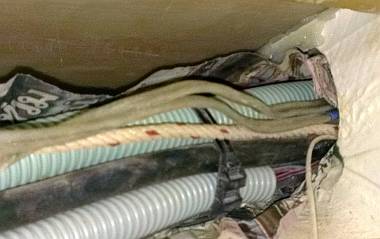 Bundle of wires (& string) disappearing into an inaccessible hole |
Jon worked on the wiring for most of the day. You'd think that with Ocelot completely torn apart that running wires would be easier - and it is, but Ocelot's builders still found places to run wires that are inaccessible, even now. Luckily, whenever we finally get a wire through one of these inaccessible areas, we also lay a string, so next time we only have to pull the wire through.
The main wires to upgrade are: the speakers (2 inside and 2 on the targa‑bar), power to the computers (2 of our computers are really desktop replacements, and pretty thirsty), cockpit and aft‑deck lighting (running wires all the way out to the targa‑bar and sugar‑scoops), running the new 220vAC to the washing machine (port fo'c's'le), and 2 new depth transducers, one in each fo'c's'le. The new radar will need new wiring as well, but that's still down the road a bit. Of these, Jon got the 4 speaker wires run, using local heavy gauge tinned wire, and he ran a new tinned copper wire pair out to and up inside the targa‑bar for the cockpit lighting. This last wire still needs to be extended out to the sugar‑scoops.
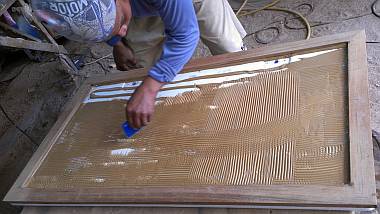 Houa spreading Sika on top of an already framed cockpit hatch |
One reason we put the speakers on a high priority is we're desperate to play some of our own music. The guys play music (or listen to local radio) through their phones and a Rube‑Goldberg‑esque collection of speakers. Some of it's quite nice, even if we can't understand the words (but who pays much attention to lyrics anyway?) But some of it definitely falls into the "music to curdle your lunch by" category, and we're getting a bit sick of Thai commercials. We'll see how the guys perform when we crank up some good ol' 60s Rock & Roll! Chicago, Boston, Doobie Brothers, Santana, Elton John, Billy Joel, Animals, Beach Boys, Beatles, Byrds, oh yeah!
Sue could be found crawling around the gutted out starboard passage helping Jon with the wiring. Or you might have seen her on the scooter on one of 4 errands buying sandpaper, getting chicken for lunch, going to the bank, or making a general hardware store run. Or you might have caught her with a wire brush, soapy water and sand paper cleaning up bolts for a variety of deck hardware. She finished the day with the hot, dusty, sweaty job of wiping down the salon (newly emptied of many boxes and bits) and all of its seats and shelves. Lady of all trades.
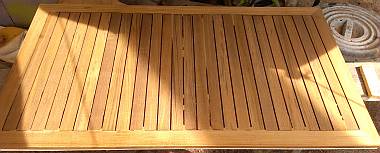 After sanding, the Golden Teak looks really nice |
Houa got some great work done as well. Having finished the bonding of the teak to the first of 3 cockpit hatches, he worked on the second and third, the ones with longer teak planks inside the frames (because of their orientation). We got to watch the whole process starting with laying out the long planks, planing them smooth, cutting and sanding them to the exact length, and then wedging the planks in side‑by‑side to form a rectangle of planks. Then he super‑glued those planks together before lifting out the block of slats. He cleaned the hatch and brushed the primer onto both the hatch and the back of the rectangle of planks. After waiting for the primer to be dry to the touch (about 10 minutes) he used the big Sika sausage gun to splurb on the brown Sika 298. He paddled it smooth (well, ridged), adding more where the hatch handles make an indent. Then he lifted the whole rectangle of planks into place, knocked it tight and added the last single strip. Then he did the Thai foot dance to press the boards down, followed by the more conventional wood strips and clamps, topped with epoxy jugs filled with sand as weights. Score at the end of the week: 3 of 4 hatches covered in teak! Woohoo!
Thai Refit:
Ocelot Pages:
Top Level: Home | Destinations | Cruising Info | Underwater | Boat Guests | Ocelot | Sue | Jon | Amanda | Chris | Site Map | Make a Comment
|
If our information is useful, you can help by making a donation |
Copyright © 2000‑ Contact: Jon and Sue Hacking -- HackingFamily.com, svOcelot.com. All rights reserved.