Top Level

Home
Destinations
Cruising Info
Underwater
Yacht Ocelot
Ocelot's Crew
Site Map

Ocelot Pages

Up
Ocelot Layout
Ocelot's Deck
Cockpit Photos
Inside Ocelot
Kronos 45 Specs
Modifications
Refrigeration
Venezuela Haul Out
Tonga Haul Out
Thai Refit

Thai Refit

Rebuild Decks
Extend Transoms
Cockpit Area
Below Waterline
Bimini
Spars
Deck Hardware
Exterior Lockers
Salon
Galley
Cabins
Heads
Interior Floors
Electrical
Maintenance
Weekly Logs 2012
Weekly Logs 2013

Extend Transoms

This page is still very much under construction...

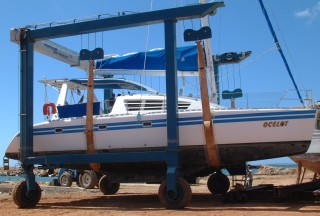
Never thought we'd see Ocelot flying!

Pretty much ALL catamaran owners eventually want to extend their transoms.  It provides for bigger swim platforms, a bigger area to step onto or out of the dinghy, and in our case, we could redesign our swim ladders.  The longer waterline improves speed through the water, we could improve water‑flow back there, and the extra flotation reduces hobby‑horsing when sailing through a short chop.

Extending the transoms was originally on our "maybe" list, but we're very glad we did them.  Ocelot's sterns were originally pretty abrupt, with the hull ending still several inches down in the water.  This created turbulence when sailing, slowing us down somewhat.  Getting to the small swim platforms involved climbing 3 essentially vertical steps up the back wall of the engine room, which was difficult when schlepping scuba tanks or even just groceries.  The swim ladders were big and heavy teak and stainless steel affairs which folded up on top of the limited space available, so they made getting into and out of a dinghy a bit dangerous with their large holes between the rungs ready to twist an unwary ankle.

Our requirements for the new extensions included:

  •  Ocelot's sterns should be clear of the water at rest
  •  The "rocker" (curve of the bottom of the hulls) should not change
  •  Top of the extensions to form a larger, slightly sloping (for drainage) swim platform
  •  Real steps coming down to the swim platform instead of the existing bolted‑on steps
  •  Outside walls to extend to the ends of the extensions
  •  Inside walls to remain as they are, to facilitate getting in and out of the dinghy
  •  Swim ladders to be out of the way but instantly available
  •  Edges of the swim platform to be protected by stainless steel
  •  Nice grab‑rail going down to the swim platform


Lofting:
Lofting is the process of laying out all the dimensions of a boat, or boat additions, before building.  Being an engineer, Jon would much rather have lofted everything, planned it all out, and laid everything out on a nice, clean, concrete floor.  But our floor is just sand, and we didn't even have a good idea of where the waterline would go after Golf had his workers grind off all our underwater gelcoat.  So we realized that the extensions would have to be done largely by eye.  Luckily, Golf, for his many, many faults, has an artist's eye, and considerable imagination.
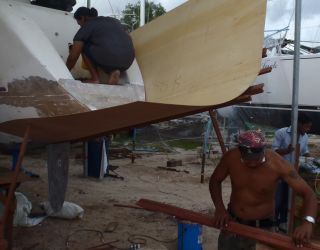
Building the forms for extending our sugar-scoops
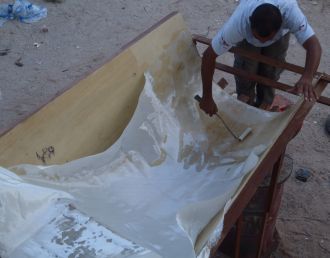
Wetting out the second layer of fiberglass

First attempt:
 

Transoms :
 

More bi-axial fiberglass for our sugar-scoop extension
Pulling the wood mold off the starboard extension
   
Houa building the frame for our transom extensions (take 2)
First bit of foam epoxied to our starboard transom
Houa setting up the framework for port side extension
Golf, Boy, & Houa laying glass on top of the foam extension
Baw epoxying on the port-side transom extension
Houa working on the port-side transom extension
Boy grinding the gelcoat off stbd transom, above extension
Max & Golf glassing the inside of starboard transom extension
Center spines for the transom extensions (upside down)
Port sugar-scoop with gelcoat (finally) ground off
Port extension reshaped with a frame & a Spanish windlass
Baw smoothing a joint-line on starboard extension
Houa & Baw epoxying biaxial glass into the port extension
Fitting & mudding in the spine & frames on starboard extension
Spine & frames being epoxied into starboard extension
Houa trimming starboard extension frames to fit the top
Baw clamped the frames on port to make them straight
Jon & Baw taping the mudded corners on port extension
Jon & Baw sticking down the top of port extension
Houa with a possible new aft profile for Ocelot
Baw covering the port extension in biaxial fiberglass
Jon & Golf discuss starboard extension
Baw & Lek shaping the foam for the outer wall of stbd extension
Glassing in the starboard transom extension
Port transom extension with skin of outer wall in place
Starboard transom extension with skin of outer wall in place
Foam strengtheners to go inside the outer walls
Starboard sugar-scoop with lines where steps will go
Port sugar-scoop with lines where steps will go
Baw & Lek building frames to pull the curl out of stbd outer wall
The organized pandemonium of work on Ocelot
Baw reaches deep into the extension wall to mud in the frames
Lek & Baw glassing the insides of our extension wall
Baw & Lek glassing the cells inside the port extension wall
Ocelot being worked on - click for larger view
Lek glassing insides of port wall under a cloud of shade-tarps
Baw checking cuts on port wall, so we can start curving to the top
Baw carefully trimming down the inside of the port side wall
Baw & Lek grinding down the foam to fit the new top of the wall
Baw & Lek fitting the foam for the top of the extension wall
Baw trimming the foam for the top of the wall
Baw mudding the foam & sticking it down on top of the wall
Top of wall screwed down to cure in the correct shape
Baw cutting down the starboard wall to match port
Max glassing the targa support while Baw works on stbd wall
Baw gluing foam blocks into the outside of the starboard wall
Baw trimming foam for the top of the starboard wall
Foam blocks being epoxied into the outside edge of stbd wall
 
Baw mudding up the top of the starboard wall
Lek & Baw laying the first sheet on top of the starboard wall
Baw & Lek laying the second sheet on top of the starboard wall
Baw & Lek securing the top of the starboard wall
Lek & Baw fitting foam to the top of the port wall
Bundled foam strips from above - the curve they follow is complex
Baw & Lek building clamps to hold the bundled foam
Lek & Baw clamping the strips & epoxying them together


Thai Refit: Up | Rebuild Decks | Extend Transoms | Cockpit Area | Below Waterline | Bimini | Spars | Deck Hardware | Exterior Lockers | Salon | Galley | Cabins | Heads | Interior Floors | Electrical | Maintenance | Weekly Logs 2012 | Weekly Logs 2013

Ocelot Pages: Ocelot Layout | Ocelot's Deck | Cockpit Photos | Inside Ocelot | Kronos 45 Specs | Modifications | Refrigeration | Venezuela Haul Out | Tonga Haul Out | Thai Refit

Top Level: Home | Destinations | Cruising Info | Underwater | Boat Guests | Ocelot | Sue | Jon | Amanda | Chris | Site Map | Make a Comment


Sevel Seas Cruising Association Lifetime
Commodores
of the
Seven Seas
Cruising
Association
Seven Seas Cruising Association
If our information is useful,
you can help by making a donation

Copyright © 2000‑  Contact: Jon and Sue Hacking -- HackingFamily.com, svOcelot.comAll rights reserved.