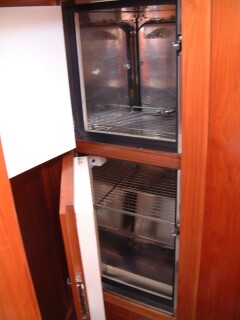
Existing port side freezer.
Beautiful stainless steel construction.
Holding plates (2) are at the back.
|
Top Level Ocelot Pages |
Refrigeration
 Existing port side freezer. Beautiful stainless steel construction. Holding plates (2) are at the back. |
Cruisers love cold drinks. In this heat, it's almost a necessity of life! When we bought Ocelot, there were 3 refrigeration systems cooling 2 actual refrigerator boxes. Two of the systems were what we call "mechanical / holding plate" systems (one in each box). One fridge was in the galley and the other was just down the port companionway, between the 2 bathrooms (see diagram, and picture at left). The one down the port hull was meant to be a freezer, as it has 2 huge holding plates as well as a separate water-cooled electrical cooling system.
A mechanical holding plate system is basically an automobile air-conditioner compressor system connected by a fan belt to the engine. These are complex, powerful and expensive systems. Instead of cooling air, these units freeze a stainless steel tank of antifreeze (the "holding plate") in each fridge. In our case, each engine has a compressor, each cooling one of the two refrigerators. But this meant that each engine had to be run for 3 hours/day, just to keep the fridges cold. This is fine for charterers, who are usually moving (motoring) every day, but cruisers often sit for days or weeks at a time in a pretty anchorage. We prefer not having to run our engines like that (and the engines don't like it either - diesels prefer to work hard once they're warmed up).
The main problem with our fridges was that both of them had front opening doors. This configuration is common and what most domestic fridges use, because it's the most convenient for getting food in and out. But whenever you open such a fridge, all the cold falls out on the floor - a waste in the tropics (here, let me cool your toes). A top opening design (like a chest freezer) is actually much more energy efficient, and that's what we wanted.
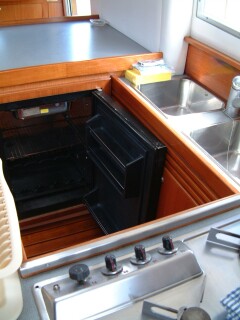 Old galley fridge, with door open, before the conversion. Note holding plate at top. |
So we decided to remove the fridge in the galley and convert it to be a well insulated, top-opening, electrically cooled, primary fridge/freezer. While this was going on, we would live off the nominal freezer system down the port hull, running its electrical system all day and running that engine when we had to.
Removing the existing fridge turned out to be very easy, as it was just a modular unit. We were even able to salvage the old holding plate, as the lines from the compressor had self sealing connections that maintained the refrigerant charge.
When we removed the fridge, we found it had only an inch (well, 3cm) of insulation and it was lined in stainless steel - fancy, pretty, and expensive, but not ideal thermally. We wanted to put in 4-6" (10-15 cm) of insulation, but this would make the resulting space too small for our primary fridge. So we condemned our dish cupboard (on the back side of the fridge) and cut out the dividing wall to get more space. This gave us a space about 33" long x 22" wide x 41" deep, or about 17 cubic feet. (For you centimeter folks, that's 84L x 56W x 104D, or 490 liters). Lots of room! But wait a minute - that doesn't count the insulation. We wanted 4" all around, 5" on the side towards the companionway where the sun comes in, and 8" on the bottom where it's coldest. So suddenly our space shrinks to 24"L x 14"W x 31"D, or about 6 cubic feet - small, but not impossible (in cm, that's 61L x 35W x 79D, or 170 liters).
 Jon's father cutting the top-opening door for the fridge |
The refrigeration compressor we decided to use is a fairly standard 12 volt unit made by Danfoss. We mounted it on the bulkhead just under the helm in a large compartment. The part that gets cold is called an evaporator, which probably needs some explanation. The refrigerant (ozone safe R134A) is circulated in a big loop, from the compressor (mounted outside the fridge) to the evaporator (inside the fridge) and back again. It arrives at the low pressure side of the compressor as a cool gas, and the compressor compresses it (of course) which makes the gas hot. The hot gas is then piped through a small radiator with a fan blowing over it. This cools the pressurized refrigerant, causing it to condense into a liquid. This liquid refrigerant is then piped to the evaporator, inside the fridge, where it is forced through a narrow opening and then allowed to expand and boil (or evaporate) which causes it to get very cold. The evaporator is a long series of tubes, and the cold gas refrigerant flows through these, cooling the refrigerator, and is then piped back to the compressor and the cycle starts over again. (So much for refrigeration fluid dynamics 101, usually a university course). A thermostat on the evaporator tells the compressor when to turn off and on. The whole thing is so silent that it's very difficult to even tell that it's on.
Work started by painting all the wood with epoxy to seal it, taping over all holes, and then gluing a layer of foil around the entire interior as an infrared radiation barrier. Then we meticulously fitted 1" (3cm) thick sheets of special polystyrene foam (not as good as polyurethane, but what we could get in St. Martin). We glued the foam in place with expensive squirt foam from a can. This also sealed cracks and corners. A nice teak board had to be made up to cover the old door opening, and my father cut the new door in the countertop (see picture, above).
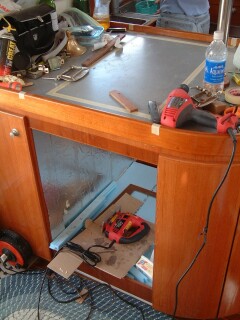 Working on the new fridge - what a MESS in the galley! |
Once the foam was in, it had to be shaped a bit for the tapered door and the evaporator unit. We made up a special board for the evaporator and the old holding plate to mount to, and mounted the board on the freezer side, towards the companionway. Then the whole interior had to be epoxy fiber-glassed, faired smooth, and painted white with a food-safe, 2-part, polyurethane paint. The evaporator was mounted near the top of the box, with the old holding plate mounted underneath it, and the connecting refrigerant hoses were fed through a 2" hole in the bottom of the fridge. Once a drain pipe was fed through this hole as well, the hole was also filled with foam and sealed with epoxy and fiberglass. We also added some shelves so everything wouldn't just be piled on the bottom.
We decided to make the top hinged in the middle, so it could opened from either side. The galley side could access the fridge, and the companionway side could access the freezer. So the top was cut in half, epoxy sealed, foiled, and connected back together with a stainless steel piano hinge. The Formica top was routed out, epoxy sealed, and the door handles glued and screwed in. The foam was then stuck to the foil, shaped, fiber-glassed, faired, and painted.
To make the door gasket, we taped wax-paper to the inside of the fridge, and shot silicone rubber on the door. Then we put the door where it belonged and stacked weights on top (school books work well for this) until the silicone cured, about 2 days. Take off the top, trim off some excess silicone, and we've got a 2" thick custom fitted gasket.
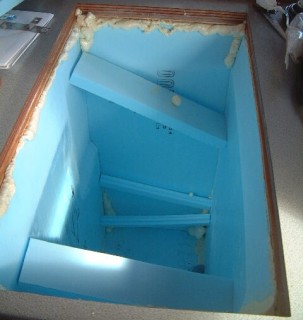 Using white squirt-foam to glue the blue foam panels into the new fridge. |
The evaporator we got was in the shape of a rectangle, as wide as the fridge, about 6" across, and a bit more than a foot deep. This is where the cold comes from (or, more accurately, where the heat is extracted from). By putting a thin layer of insulation around the evaporator, food placed inside the evaporator freezes, while the rest of the box is kept cool (but doesn't freeze the lettuce).
Another innovation stems from the fact that we drink a lot of water here. Opening the fridge constantly to dig out the cold water uses a lot of electricity. So we fitted a small water-tap to the front of the fridge, and one of these days we'll connect it to a tank on the inside. Then, after filling the tank in the morning, we should have cold water on tap all day.
So, how well does it all work? Quite nicely, thank you. You can also see Chris's thoughts on his fridge conversion page. The fridge runs about half the time (a bit more than we'd hoped, but quite satisfactory), drawing about 5 amps when it's on. 5 amps x 24 hours x 1/2 duty cycle means it consumes about 60 amp-hours/day of electricity (see Chris's energy budget). This setting keeps food in the freezer frozen solid at about 12°F (-10°C) and the fridge runs at about 40°F (5°C) - ample for our needs. The old port-side freezer is now only used as storage. Even with my father's wonderful help, the project took somewhat longer than we wanted. The fridge didn't become operational until April 2002, after most of our early guests had already left. But the results are worth it. And best of all - the solar panels keep it all running. No engines needed. The hotter the sun, the colder the beer!
Top Level: Home | Destinations | Cruising Info | Underwater | Boat Guests | Ocelot | Sue | Jon | Amanda | Chris | Site Map | Make a Comment
|
If our information is useful, you can help by making a donation |
Copyright © 2000‑ Contact: Jon and Sue Hacking -- HackingFamily.com, svOcelot.com. All rights reserved.