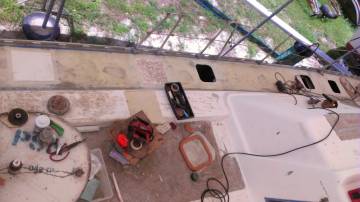
Portside hatch openings - aft 2 finished and covered for rain
48 Hatch Frames
 Portside hatch openings - aft 2 finished and covered for rain |
Summary: Work this week focused on the bimini and the foam frames that the 12 deck hatches will sit on. On the bimini, we cut away the foam and glass at the back on the underside, where it will bolt to the targa bar. Then Jon carefully ground a nice taper into the foam so there'd be no discontinuity that might create a stress concentration. We covered the whole underside in a 2nd layer of biaxial glass and then laid 3 strips of glass across the back bolt surface in increasing widths. The whole bimini seems much stronger now so we hope we're finished with the structural glass. On the hatch frames, Baw and Houa carefully epoxied them down to the deck. Then they punched out the foam where the bolts will go and filled those areas with reinforced "hairy" epoxy mud. Four of the 5 hatch frames on starboard side have been glassed in with 3 layers of "UD" glass, and all 5 frames on port side are prepped and ready to glass. We took 2 lengths of anchor chain and 1 anchor to our metal fabricator to be regalvanized. Sue worked hard cleaning up the hatches themselves and Jon spent his idle time polishing the mast, a job that will continue for some time.
Monday, October 1:
Pretty slow day today. Beautiful weather, but Baw only showed up about 3pm (a bit hung over?)
and Golf was busy on another boat and Sue was out getting fitted for a crown and then recovering
from that, so only Houa and Jon were actually working.
Houa spent his time on the hatches, finishing trimming the 10 aft openings and fitting the foam frames. The frames will be stuck down with epoxy mud and allowed to cure, then the locations for the hatch mounting bolts will be marked and drilled out with a plug‑cutter (like a tiny hole‑saw). The mounting holes will be filled with epoxy mud and then the foam frames will get covered in 2 layers of biaxial glass.
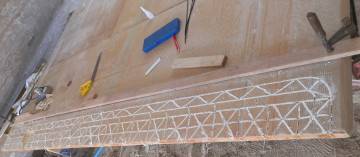 Aft edge of the bimini - only star cuts at back are full depth |
Somewhere in there we also need to make sure that the frames are the right height. The hatch coamings come down the inside of the hatches and sit against the headliners in the cabins, giving a nice professional finish. The coamings define the distance between the hatch and the headliner, so each foam frame will have to be trimmed down until it's the right height.
This, of course, requires getting the headliners so we know exactly where they go, but some of them are still getting repaired...
Jon started the day by taking more measurements from the targa‑bar. He was finally able to draw an accurate centerline, and from that he measured exactly how wide the targa‑bar and the davit‑supports that bolt to it at the top are - 2.66m or 8' 8¾". This is 8cm or 3¼" less than the bimini, so Jon decided to leave a bit on the sides of the bimini instead of cutting out the foam all the way across, marking out exactly how far to cut.
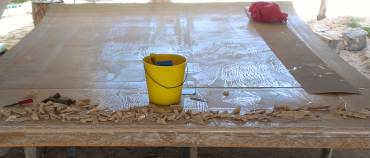 After knocking out the foam blocks with hammer & chisel |
Golf's router came back from Bangkok with its new motor, the old one having burned out because of the poor electricity at the yard. Houa fitted it with a long bit and Jon used it to slice up the back of the bimini, where we want to get rid of the foam. The first cuts were almost full depth, cutting almost down to the top layer of glass (the bimini is upside down, and Jon is working on the underside). The next cuts were shallower for the tapered section, cutting just through the center sheet of glass and then cutting just the bottom layer of glass. Once the glass is removed, the shaping of the foam should go much more easily.
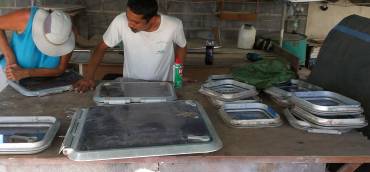 Sue removing the acrylic from our hatches for replacement |
Tomorrow Jon will use a chisel to remove the fiberglass and a sanding grinder to trim the foam to a nice taper. Then we'll lay another sheet of glass over the whole bottom, and 3‑4 more strips of glass along the back edge, to build up a strong bolting surface. That's theory, anyway...
Tuesday, October 2:
Another beautiful day - hope this nice weather lasts! And we actually accomplished some good stuff.
Our big news is that we've started renovating our hatches. Sue and Golf's beautiful wife Mai collected all of our hatches from Golf's storage area and immediately started taking them apart. They need to be cleaned up (of course) and several need to have the acrylic replaced. Polycarbonate is stronger than acrylic, but acrylic is more UV stable, so it's usually used on deck. Interestingly, the acrylic is only held into the frames with silicone, not one of the polysulfides (5200 or Sikaflex). Some of the hatches also have seized latches, which is a chronic problem with these Goiot hatches, especially if they don't get opened very often (we never had problems when the kids were on board). Hopefully we can find 10 that can be brought back to 100%, and we can save the other 2 for spares.
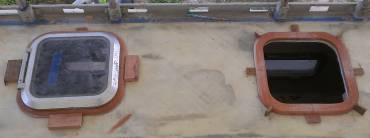 Foam hatch frames positioned with small blocks of wood |
On deck, Houa and Baw (now recovered from his hangover) were sticking down more of the foam frames that the hatches will sit on. They carefully position little blocks of wood and stick them down to the deck with super‑glue. The frame then nestles snuggly inside the blocks, and it's stuck to the deck with epoxy mud and weighted down with a plastic jug full of sand. After the epoxy has cured, the blocks are simply knocked away.
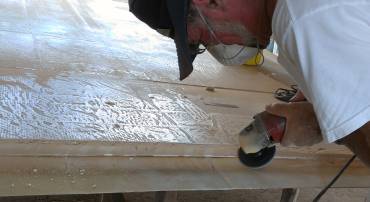 Sanding a nice taper into the foam to make a gradual transition |
We didn't have any frames under the hatches before - the hatches simply sat on the teak deck - but Golf insists that they'll look better this way. OK. These frames were originally made several months ago, and some of them have broken in the interim, but Houa was able to piece together 2 more. They take no load so they don't have to be made from single piece of foam.
While Sue was at the storage area she brought back a couple bits of our headliner so we could see if the frames are making the hatches too high, but near as we can tell everything should be fine.
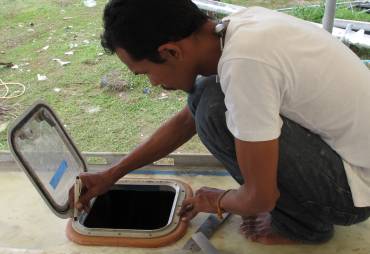 Baw marking where the hatch mounting bolts go on the foam |
Underneath Ocelot, Jon continued working on the bimini. He started with hammer and chisel, knocking out the bits of foam and fiberglass that he'd cut with the router yesterday. Then he used a sanding grinder to grind away what foam isn't needed, and to shape a nice taper into the transition between the foam bimini and where it mounts onto the top of the targa‑bar. Tomorrow we hope to lay another sheet of glass over the entire underside, as well as several strips along the back edge (where it bolts to the targa‑bar). But before that happens we'll need some more epoxy. Again...
Wednesday, October 3:
Another fantabulously glorious tropical day, but not enough epoxy to get any real glassing done.
Golf has promised us some tomorrow, but there's also a typhoon over Vietnam that's supposed to bring
several days of rain to Thailand starting either tomorrow or the next day, so we'll want to do our
epoxy work early.
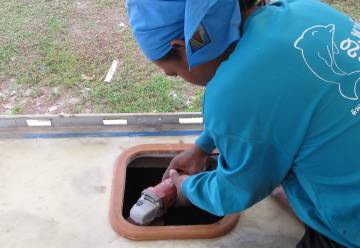 Houa grinding under the hatch openings, for the coming glass |
Our stainless steel shop, Luck Engineering, will be sending a truck to the galvanizing factory in Bangkok in a couple days, so we took Golf's truck to the storage area and loaded it up with 2 of our 3 lengths of chain and our kedge anchor. While we were there we also loaded up our rudders, as Luck is supposed to be making new lower bearings for them. Jon drove all of it to Luck's machine shop just after lunch.
Jon also cut the biaxial glass that we want to lay on the underside of the bimini. Two sheets, the full length of the bimini, don't quite cover the bottom all the way out to the edges, but the edges are already reinforced with extra glass from when we covered the reinforcing ribs out there, so the 2 sheets should be fine. All we really want to do is make the bottom a bit stronger so the bimini doesn't flex as much. We also checked the fiberglass strips that will go across the back to reinforce the bolting area and they also seem good to go.
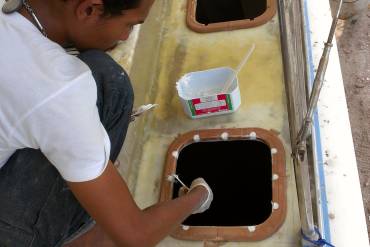 Smearing "hairy" epoxy mud into the hatch mounting holes |
Up on deck, Baw marked where the hatch mounting bolts will be on the foam frames. Then he used a plug‑cutter to cut largish holes through the foam and down to the fiberglass of the deck at those bolt points. He made a special tool to sand away the excess foam and clean up the holes.
Jon will be drilling the mounting holes and probably tapping threads into them to take machine bolts, so he asked Baw to cut some fiberglass strands into the epoxy‑mud to fill the holes in the foam frames. Epoxy‑mud can be brittle, and the glass strands help to hold it together so it won't break when tapped or screwed. By the end of the day, Baw was able to fill most of the mounting holes on the starboard side frames.
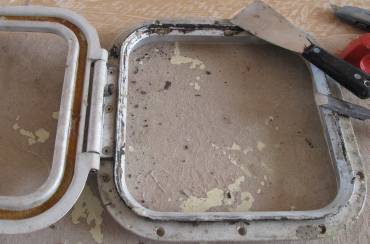 Sue's job, cleaning up the hatches so they look new again |
Houa was working on the undersides of the hatch openings. First the existing (polyester) glass had to be sanded so the epoxy can stick to it. Then the edges of the openings had to be rounded, so the glass that covers the foam frames can make the turn and stick to the ceiling under the hatches (fiberglass doesn't like turning sharp corners). The fiberglass will start on the deck, go up over the foam frames, down through the middle opening, and then back under the hatch, ending directly under the deck from where it started.
Sue was still cleaning hatches. She's got 2 of them pretty spiffy, but getting all the silicone off and cleaning them up so they're ready to get their new acrylic is a big job - some of them are pretty beat‑up. Cleaning the old adhesive out of the grooves where the gaskets lie required building bits of foam to wrap her sandpaper around so it would get where she needed it to.
With nothing to do on the bimini, Jon turned is attention back to the mast. Thankfully, the
yard folks had trimmed the grass under the mast so Jon wasn't as worried about cobras and such doing
something rude and antisocial. In just a few hours in the afternoon he polished up several
feet, working his way down from the 2nd spreader. It's mind‑numbing (and
arm‑numbing) work, but therapeutic in its own way. Instead of getting frustrated at people for
not working fast enough, he can take out his frustrations on scratches in the mast, and watch them
get polished away! ![]()
Thursday, October 4:
We had showers (not really squalls, as they had no wind) off and on all day, but we still made good progress.
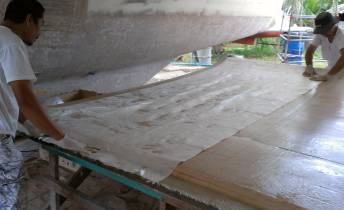 Laying a sheet of glass on the underside of the bimini |
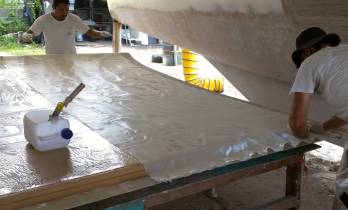 One width of our roll covers about half the bimini |
Our big news is that we finally got the last of the structural glass on the bimini! We got everything ready as soon as we arrived at the boatyard, waited for a shower to blow over, and then Golf and Baw helped us lay a final sheet of biaxial glass on the underside, and 3 strips of glass in increasing widths along the back, where it will bolt to the targa‑bar.
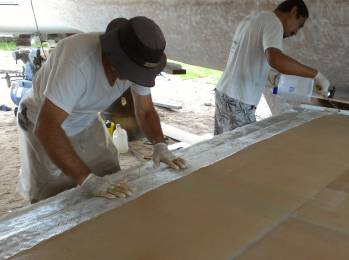 Laying down the first strip of biaxial glass at the back |
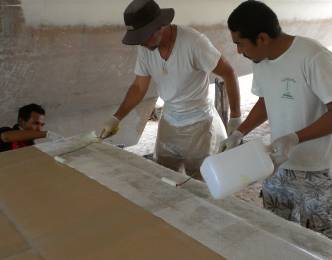 3 Strips of glass were laid down in increasing widths |
Once the hard work was done, Jon tried something new. We laid a sheet of polyethylene over the back and then used dry rollers to roll the air bubbles out from underneath the plastic. Once we had the plastic lying down smoothly on the new fiberglass, we put a large board that Jon had sanded flat and smooth yesterday over the bolting surface at the back of the bimini and clamped it down. This should give us a nice smooth bolting surface, with only minimal work.
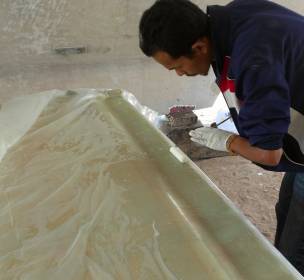 Rolling bubbles out from under the sheet of plastic |
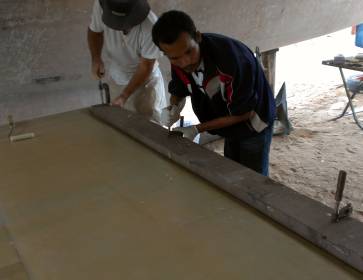 Clamping a board down on the plastic covered bolt surface |
Up on deck, Baw continued to drill out the hatch bolt holes in the foam frames. Then he mixed up some epoxy mud, cut some fiberglass strands into it to keep it from cracking, and filled the holes with this "hairy" mud. Working on the port side today he was able to finish all 5 hatches.
Houa was working on the starboard side, sanding the hatch frames smooth and preparing them to get glassed in. If the typhoon currently over Vietnam holds off for another day we should be able to glass the starboard frames in tomorrow.
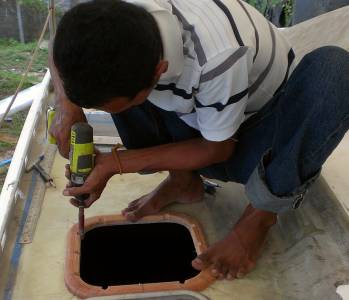 Baw drilling out the port side hatch mounting holes |
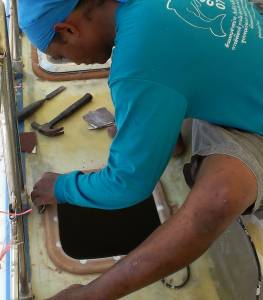 Houa prepping stbd frames for glassing |
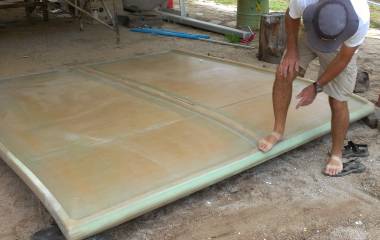 Jon testing the flex of the new bimini - Nice & strong now! |
After lunch, Sue returned to her hatch cleaning, managing to get another hatch pretty much finished and ready to receive its new acrylic and then be bolted down to the deck. Apparently there are 2 kinds of acrylic, cast and extruded. Cast is apparently better, but we'll have to see what's available here in Phuket. Golf is reporting that he can't find our tint, so we're going to have to go to Phuket Plastics with him to see what's available.
Jon continued his therapeutic session with the mast, polishing up another 10' (3m) section. Golf has promised us a special cloth wheel for final polishing, which we're looking forward to.
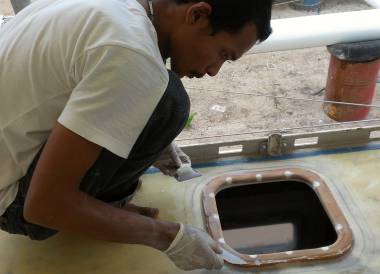 Baw applying epoxy mud filets to soften the corners for the glass |
Friday, October 5:
Another day of off and on showers, but we forged ahead. Let's hope all the epoxy set!
The best news on the morning was that yesterday's bimini epoxy was all well cured! We took it out and flipped it over and Jon danced on it a bit. It's much stronger now and the front hardly flexes at all. Yay! A bit of flex near the back but we expected that. It's a bit heavier than we expected, probably 110 lbs (50 kg) for 90 square feet (8.4 m2) but we can deal with that.
Jon attacked the aft‑most edge with the jig‑saw and grinder to give us a clean, straight edge, and sanded off the other rough edges that always happen when laying fiberglass. The area under the polyethylene sheet was beautifully smooth and should give us a nice flat area to mount on the targa‑bar.
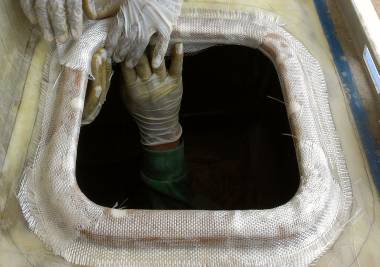 "Torturing" the glass to get it lie down smoothly inside & out |
Sue continued on her hatch cleaning, spending all day on one of the large fo'c's'l hatches (2' or 60 cm square). Golf said there's a "marine" plastics shop with more acrylic choices in town. It's more expensive, of course, and may only sell by the full sheet (4'x6' or 1.2x1.8m) but it may also have the better quality "cast" acrylic instead of the more common extruded acrylic.
Golf wanted to know the thickness of the big hatch acrylic so he could get a quote from that shop. After much grunting and Jon's help we were able to pop out the very crazed acrylic square. It's quite thick, at just under ½" (12.2 mm). Golf showed us a sample of what the shop has - it's darker tinted but that's OK with us. A sheet of 6mm for the 12 small deck hatches is $113 and the 12mm is $210 (and we'll only use 2/3 of a sheet) but it's still much cheaper than buying new hatches.
The biggest accomplishment of the day happened up on deck where Jon, Baw and Houa got 3 layers of fiberglass epoxied down over the 3 starboard aft foam hatch frames. This glass is just to protect the foam. Golf had originally said they'd use 2 layers of biaxial glass, but biaxial doesn't go around bends easily, so they used what they call "UD" glass which is thinner and much more flexible but is not unidirectional, despite what they call it.
It was a fiddly business, getting the glass to go around the corners and fold down inside the cabins and still lay down flat and smooth. Houa had the sweaty job of being the "inside man", working in the almost airless aft cabin. Baw and Jon got into a rhythm of laying the glass and brushing on the epoxy. Baw liked pulling one long strip into place all the way around the 4 sides, but Jon preferred to cut it into strips to let it lay down more easily. They compromised by doing a bit of both!
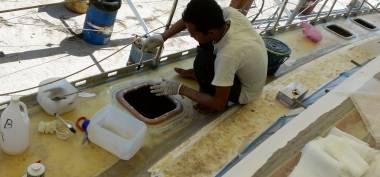 Baw glassing the 4th hatch on starboard side |
Saturday, October 6:
Despite the (unexpected) good weather, the week ended with a long slow day.
Houa and Baw continued to work on the foam hatch frames, what the hatches will sit on when they're bolted down. They glassed in the 3 starboard aft hatch frames yesterday (there are 6 on each side). The next one forward needed some fiberglass repairs under it, so it's a bit behind the others. The front hatches are being changed for larger ones and that work hasn't progressed beyond laying them out. The last hatch frame on starboard was quickly prepped and glassed in this morning.
The rest of the day was spent preparing the 5 port side hatch frames for glassing, sanding them down on top and underneath, and laying out lines for how far the glass should go. They're finished now and should get glassed in on Monday.
Sue took advantage of Baw's morning epoxy mixing to get a few more layers of fiberglass circles put in the pad eye bolt holes up in the fo'c's'ls, always a hot and sweaty job. Not a favorite place to work, and she has refused to be the one to do the final sanding of the fiberglass to ready the big circles for final glassing and a metal backing plate. Been there. Done that. Age must have some privileges.
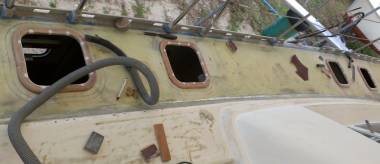 4 of the 5 prepped hatch frames on port side, waiting for glass |
Nothing new happened on the bimini. We're still trying to find really narrow PVC pipe to lay along the edges of the bimini to create a bolt rope channel to thread our cloth awnings. These need to be glassed on before the gelcoat. A friend says he knows where to get it, but we've been unable to contact him recently.
Jon attacked the mast with a new set of $4 polishing disks, some effective, some not. He is having fun getting rid of all the corrosion marks, giving us a nice polished mast. It should end up glitteringly bright once the Nyalic is on.
Sue spent the afternoon with silicon pick, scrubbie, chisel and razor blade, working on cleaning up the hatches. When we asked Golf for a quote on doing the hatch clean up some time ago, he in turn asked Houa, who said it would take 2 weeks, or about 10‑12 days. We didn't want to pull Houa off the more critical carpentry and foam work but it looks like they were pretty spot on, as it is taking hours and hours to do each hatch.
TGIS! Happy weekend! As we normally do after the work week is over, we threw our guys a beer and chips party. Now we're off to the little "Cruising Yacht Club" (a tiny yachtie bar right on the Chalong Bay waterfront) for fish and chips, huge burgers, and cold beer.
Thai Refit:
Ocelot Pages:
Top Level: Home | Destinations | Cruising Info | Underwater | Boat Guests | Ocelot | Sue | Jon | Amanda | Chris | Site Map | Make a Comment
|
If our information is useful, you can help by making a donation |
Copyright © 2000‑ Contact: Jon and Sue Hacking -- HackingFamily.com, svOcelot.com. All rights reserved.