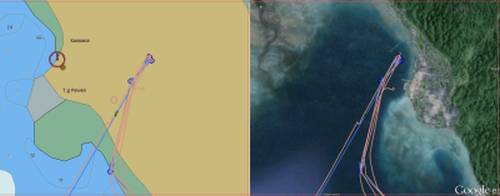
CM93 chart vs a GE KAP over exactly the same area. Which do you want?
|
Cruising Info Equipment Pages |
KAP Files
This page has now been superseded.
Not only has Google disabled Google Earth functionality, rendering much of this page no longer possible, but mbTiles are better than KAPs.
Please see our Making mbTiles page now for instructions on making extremely high quality navigational charts from satellite imagery, as well as Navionics and CMap nautical charts.
Chart accuracy and chart detail are often problems when cruising off the beaten track. It can be difficult to find accurate charts, especially in remoter areas. This article will show you how to create your own extremely accurate navigational KAP files from Google Earth imagery. These are not quite charts because they have no depths, lights, or other aids to navigation, but the land and shoals they show are very accurately positioned, and a practiced eye can identify reefs and can often find anchorages. We focus here on using them with the free and open source OpenCPN navigation program, but KAP files are an open standard and most navigation programs can correctly read and use them.
Overview:
This article will explain, even to the novice, how to use Google Earth to easily create accurately positioned
(geo‑referenced) navigation files (charts) which can then be used with your navigation program when you're out
cruising and offline. You can automate this process by making simple route files that define where you want
accurate charts. The GE2KAP program then drives Google Earth
along these routes and creates the charts as slightly overlapping KAP files, which can then be fed into your navigation
program. The route files can define an area, or a coastline, or a random route where accurately positioned land
is important. OpenCPN is assumed as the navigation program,
but most navigation programs can display the KAP files produced here. All programs used are available for free on the internet,
but they all change fairly often, so some of the screen‑shots may change with newer versions (this article was
last updated in early 2016).
We start off with some background information, and the actual procedures start after that in the GE2KAP section.
For this article, we've provided information on the following areas:
 CM93 chart vs a GE KAP over exactly the same area. Which do you want? |
Google Earth (abbreviated GE in this article):
Google Earth is Google's program that displays the earth's surface, mostly from satellite imagery. It's an amazing system, and Google
offers it to the public for free! All the many GE images we've checked have been positioned
(geo‑referenced) exactly correctly. It seems to be more accurate than most WAAS
compliant recreational GPSs (and virtually all charts) and is certainly accurate enough for marine navigation.
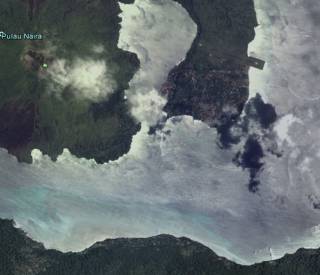 The southern bay in the Banda Islands is pretty shallow, but reflections prevent seeing that |
Using Google Earth offline:
If you're cruising in areas that have internet access, then using the
GE plugin with OpenCPN is an excellent option,
as the plugin gives a good side‑by‑side view of your charts and GE imagery, with your boat plotted on both.
There are also at least 2 ways that GE information can be used in an offline environment (like a cruising boat). One way is to
pre‑load the GE cache before using the GE plugin for OpenCPN. We explain how to do this on our
OpenCPN page. But this method can't easily be shared with other cruisers, and Google frequently updates its
database, invalidating all cached info (which can be extremely frustrating, as collecting the data can take hours).
An alternative way to use GE data offline that solves both problems is to take screen‑shots of GE and convert them to correctly geo‑referenced navigational files. These files tend to be quite large, but they're permanent, stand alone, and can be shared between cruisers. This page explains how to create correctly geo‑referenced KAP files and how to use those files with OpenCPN. It looks long, but that's because it's written so anybody should be able to do it. (If anyone has any problems understanding anything on this or any of our pages, you're probably not alone -- please contact us so we can improve our pages.)
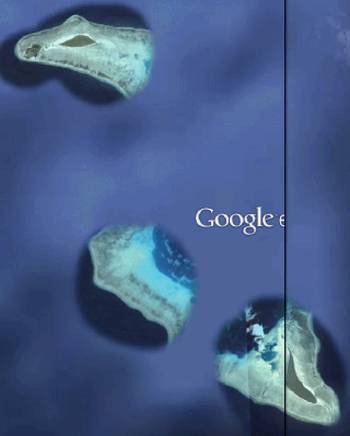 Extensive reef and island system disappearing into Google's fog in SE Indonesia |
Google Earth Inaccuracies:
Google isn't perfect. One issue we've noticed is that some (remote) islands are only partially displayed, and some
are not displayed at all. Google seems to have started by covering the earth in a purple fog and then poking holes
through that fog where they think land exists. Then they buy satellite images and put them in those holes.
But the locations of those holes in the fog seem to have originated from navigational charts, some of which have
significant errors (over a mile). Somewhat surprisingly, Google is slow to fix these errors and reposition these
holes in their fog, even when they've got the evidence of satellite imagery to show where islands actually lie.
We've seen several instances where half an island is poking out of the side of a hole in the fog (while the rest of the
island is obscured) and a few cases where the hole misses an island completely. So be warned that sometimes
islands and reefs exist that are not displayed on GE. Luckily, there are not many of these, and they're mainly
in rather obscure locations (like eastern Indonesia, where this article is being written![]() ).
).
Google is obviously interested in land, but apparently they're less interested in reefs. They show most reefs (which is extremely useful for marine navigation) but some are obscured by the fog, and sometimes the sun's reflections on the water prevent seeing into the water. Where GE shows a hole in their fog, what's displayed is accurate, but just because GE shows fog does not mean there's nothing there but water. Obviously, a prudent mariner will not depend solely on any one tool, but will use all the tools available.
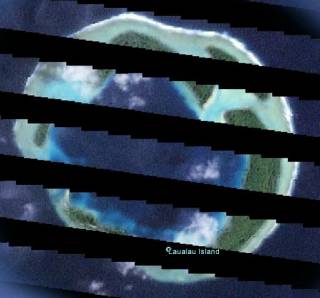 Defaced Laualau Atoll, north of PNG |
We've noticed that some island groups, like the Admiralty Islands north of Papua New Guinea, have jagged black lines running through them. These appear to be satellite images that were put into the GE system, but were later determined to be incorrect for some reason. Rather than removing the images, Google simply defaced them. We have not been to those areas, so we can't comment on GE accuracy there, but the images aren't very useful after they've been defaced.
Finally, the resolution available in GE is highly variable. Some images are so detailed that we've seen a lone hiker walking on an ice‑field in the Himalayas, but other images seem to be purposely blurred. Some of the blurred images appear to be around military installations, and are presumably blurred at the request of that country, while others seem to be forested areas with very low populations, and presumably low interest.
Raster Charts vs. Vector Charts: Electronic charts usually come as either Raster charts or Vector charts, and most navigation programs can use both types. But there are some significant differences and limitations with each chart type.
| Raster charts | are essentially pictures of charts. The size and positions of the corners are coded into the file so navigation software knows how and where to display the chart, but that's about all it knows. Raster charts often have more detail and can look more like a paper chart, but as you zoom in the features get fuzzy (pixelated) and the print often gets too big and/or blurry to read. Zooming out sometimes makes the text too small to read. Raster charts are usually much bigger files, so a pair of CDs (1.4GB) might store enough to display, say, the islands of the eastern Caribbean. |
| Vector charts | are mathematical models of charts. Each feature within a vector chart (buoy,
depth reading, lighthouse, land outline, etc) has a location and lots of other information
associated with it, so the software knows when to display it, how to display it, and when not to
display it (to de‑clutter the display). Vector charts can have several advantages:
Zooming in with either chart type will not display any more information (although the software might switch to a higher resolution chart) but with vector charts the information that is displayed will always remain crisp and sharp. Although creating a mathematical model of a chart sounds complicated, vector charts are much more compact than raster charts - the 2009 CM93 charts for the entire world are only 1.4GB. This makes vector charts somewhat faster for nav‑programs to display. |
KAP files (abbreviated KAPs for this article):
KAPs are a form of raster chart, so they're pictures of chart information, with geo‑reference info for the corners
embedded so they can be accurately positioned. The KAP file format was originally developed by MapTech, but
it's now an open standard, so it's relatively easy to construct correctly formatted KAPs, and most navigation programs
know how to display KAPs. The object of the exercise here is to take screen‑shots of
accurately positioned GE information and turn them into accurately geo‑referenced navigational KAPs.
GE2KAP Program:
The GE2KAP program is the heart of this operation. It drives GE to defined locations, waits for the images to download from
the GE Servers, takes a screen‑shot, converts that screen‑shot to a navigational KAP file, puts in the
geo‑referencing information, and then moves on to the next location to repeat the whole process. In short,
it does all the work of creating a series of slightly overlapping
geo‑referenced KAPs. GE2KAP is a program written in the Rexx programming language by Paul Higgins.
The latest version can be freely downloaded,
but if you're going to be using it a lot, it would be nice to send Paul a donation. You can also contact Paul to
report problems or to request additional features.
Screen Resolution:
GE knows your screen resolution, and it only downloads detail appropriate for your monitor to display, increasing that
detail as your "eye altitude" (height) gets lower. Therefore, you want to use as high a resolution screen as
possible. The computers we used for generating KAPs (in 2016) have screen resolutions of 1920x1080 pixels or
better. Since these KAPs are basically just screen‑shots, the higher your screen resolution, the
more detail will be available in your KAPs, and the fewer KAPs will be needed to cover a given area.
 GE Status Bar. Lower "eye alt" (height) improves resolution |
Imagery Height:
Before it starts making KAPs,
GE2KAP lets you select the "height" (eye altitude) that you want GE to use along the routes you define.
The GE elevation is displayed on the status bar in the lower right corner of GE. Lower heights will result
in more detail, which also means many more KAPs, each covering a smaller area. Higher elevations will
produce fewer KAPs, each covering a larger area, but with less detail (lower resolution). Before making any KAPs,
you should look at your area of interest with GE and see what elevations produce the resolutions you want.
We have found that 2000‑2500m gives all the detail that GE offers (for our 1920x1080 screens) so we never need to go below this height. Since we usually don't know where we'll be stopping, we often make all our KAPs at 2500m, encircling entire islands and covering entire archipelagos. The lower altitude lets us judge water depths by color, avoid shallows, find passes into tricky areas, and often find potential anchorages. In areas not covered by cruising guides (or for folks who like getting off the beaten track) this can be extremely useful. But it can also generate a lot of KAPs, so you should read the Performance section to see how long it will take to produce your KAPs. We often make our Route files during the day, and let GE2KAP work on making the KAPs at night. After selecting an altitude, GE2KAP will compute and display how many KAPs it will need to make, and ask for confirmation before proceeding to actually make the KAPs.
GE2KAP Performance:
Performance is a moving target, of course, since computers keep getting faster and Paul keeps improving GE2KAP. GE2KAP
now looks at the little circle GE displays in the lower right corner, and waits until GE has completely downloaded a
screen‑full of information before it snaps its screen‑shot. Each screen requires downloading over
1MB of satellite imagery from the GE servers, which can take several seconds, so you want to use the fastest internet connection
you can. In 2015, with GE2KAP installed on a normal (spinning) hard drive, we found that KAPs were taking about 12 seconds to generate, plus download time.
The best times we saw were about 3‑4 KAPs/minute, or about 200/hour. In 2016, with GE2KAP installed on
a solid‑state drive and a fast US internet connection, we could make 8.5 KAPs/minute, or 500 KAPs/hour.
Installing the Programs:
To use GE2KAP, you'll need to download and install the following programs on your computer. They're all free downloads off the web.
OpenCPN isn't strictly necessary, if you prefer using a different navigation program that reads KAPs.
GE2KAP can only be run on a Windows computer, but OpenCPN will work on many operating systems, including Android
devices. KAPs will work on any device if the application knows about KAPs.
| OpenCPN: | You can use your own nav‑program, or download and install the latest version of OpenCPN
here.
It's under constant development, and new versions come out every year or so. Make sure you select the correct version for your operating system. You can also download several plugins for OpenCPN. None of them are necessary, but take a look and download whatever you think you might want. You will not need the Google Earth plugin, but you can download and install it if you want. Plugins are installed by running the downloaded file, and then Enabling each plugin on the Plugins page of the Options toolbox (looks like a wrench on the OpenCPN toolbar). |
| GE2KAP: | Download and install the latest version of GE2KAP from Paul's website. This will also install the necessary ooRexx interpreter if it's not already installed. Note that you should only install the 32‑bit version of the ooRexx interpreter, even if you're running a 64‑bit system. GE2KAP will not run with the 64‑bit ooRexx interpreter. If your computer has a fast solid‑state drive, installing GE2KAP and ooRexx on that SSD will dramatically improve GE2KAP performance. An SSD is usually much faster at large file manipulations than a spinning disk. We generally install both GE2KAP and ooRexx under a C:\GE2KAP folder, and not in the C:\Program Files (x86) folder. This lets us put all of our routes and KAPs nearby as well. If GE2KAP doesn't run correctly, run the Check.rex program (in the C:\GE2KAP\GE2KAP.Vxx.x.x.x folder) to check your installation. A Changelog.txt file in that same folder describes the most recent program modifications. |
| Google Earth: | Do not install the latest version of Google Earth!
Google has disabled the GE programming interface in recent versions. Both GE2KAP and the OpenCPN GE plugin
require that programming interface.
|
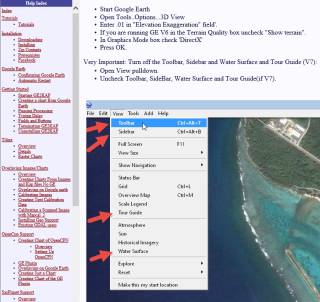 The excellent GE2KAP Help, with screen shots |
Preparing Google Earth:
GE2KAP will have to start and stop GE several times, so make sure to uncheck Show Tips at Startup. Since
GE2KAP is taking screen‑shots of GE, GE should be maximized, with minimal extra display clutter (which will show up on
your charts). You can start GE2KAP, click the Help button, and go to Configuring Google Earth to see
these steps in more detail. The GE2KAP help system is very good, with ample screen shots. It's well worth reading through it,
especially if you don't understand something.
|
Important: Then go to your Control Panel, Power Options and make sure your screen never blanks or goes dim, and your computer never automatically goes into hibernate or sleep, even if left unattended for extended periods. Turn off all power saving options while you're making KAPs or the screen‑shots could suffer. You can re‑enable your power saving options after you finish making your KAPs.
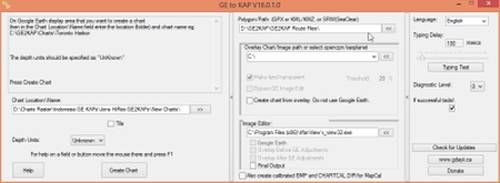 All 3 panes of GE2KAP. Cursor shows route-file location. Click for full size. |
Preparing GE2KAP:
The most reliable way to start GE2KAP is to open a Windows Explorer window, navigate to where you installed GE2KAP, and
double click the GE2KAP.rex file. Creating a shortcut to this file doesn't always work. Starting
GE2KAP will start a Command (DOS) window for the ooRexx interpreter. This sometimes displays error messages,
but otherwise can be ignored. GE2KAP will start GE and verify that it can control it, which sometimes takes a few
moments. Once GE2KAP is running:
Once you have started GE2KAP and shut it down for the first time, it will create a GE2KAP.Options.txt file. These steps are completely optional, but if you edit this file in Notepad, you can:
Types of Chart Groups:
GE2KAP uses a route file to generate a group of KAPs. Each KAP file in a group overlaps its neighbors slightly
on all sides, so there should be no gaps. KAPs are given a base name (usually the name of the route file) followed by a number
(to make the KAP filenames unique). The route that you want GE2KAP to follow in generating KAPs are standard Route
files from OpenCPN (.gpx) or GE (.kml or .kmz) or SeaClear (.srw). We tend to use OpenCPN routes to define where
we want GE2KAP to make KAPs, as it's most familiar to us. When you tell GE2KAP to Create a Chart, it will ask what altitude you want
GE to use (see imagery height). Once the altitude is defined, GE2KAP
computes the number of KAPs it will need to make, and asks for final confirmation before starting. After that,
everything is automated.
Several types of routes can be created for differing coastlines:
|
Most sailors are interested in coastlines, so lines are probably the most frequently defined type of chart group. Define a route that follows just offshore of the coast and GE2KAP can create a series of KAPs 1‑3 screens wide, covering the entire route. If there are areas along your route where you want wider coverage, simply make the route zig‑zag a bit over those areas. Or, if you know the route you're going to sail, you can use that. |
|
This gets a bit complicated. The altitude for the KAPs can (optionally) be controlled by the spacing of the waypoints on your route. GE2KAP has a mode that lets you create dual‑height KAPs from a single line route. If the points of the route are close together (say, in a harbor or around a headland) then GE2KAP makes smaller, high resolution (low elevation) KAPs. Make the points further apart where you don't want as much detail, and large, lower resolution KAPs are made at a higher elevation (see Imagery Height). In this mode, you can specify the high‑resolution altitude, the low‑resolution altitude, and the waypoint spacing below which you want the higher resolution images. This feature is useful if you only want detail in certain places, such as where you know you'll be stopping, or when a passage gets narrow, or where there are obstacles. Also, as mentioned in the GE inaccuracies section, sometimes GE only provides low resolution imagery, and it's silly to make tiny, high resolution KAPs for those areas. So this feature lets you create high resolution KAPs where you want detail, but lets you create larger low resolution KAPs where detail isn't as important. |
|
If you create a closed route that comes back to its starting point, then GE2KAP will create KAPs covering the entire interior area of the route. This is especially useful for atolls, groups of small islands, shallows, or for high‑altitude (low‑resolution) KAPs of large areas. If you want more coverage than GE2KAP normally provides along the edge of a coastline, then you can create a long, skinny loop along the coastline. |
|
If you're using GE to look at, say, a small island or even a group of islands, and you want to make KAP file(s) of what you're looking at, GE2KAP can do that immediately, without your having to define a route file first. You can create a single KAP file from the current screen simply by clicking the Create Chart button. Or, by selecting the Tile checkbox first, you can subdivide the image into a grid of 4, 16, 64, or 256 KAPs, at proportionally lower elevations and higher resolutions. |
Before You Begin:
Once you've downloaded and installed the above programs, use GE to study the areas you'll be making KAPs.
Decide which areas are just coastlines and can be defined with a route file along the coast, which are bigger areas
requiring a group of KAPs and a closed (area) route file, and which are isolated enough that you'd rather do them manually
as a single or tiled image without creating a route file at all. You might find it convenient to drop temporary marks
for where you want to change types of route files, and then delete those marks once you've defined your routes.
If you want to define your routes in OpenCPN (rather than GE) for areas where your charts have significant errors (making it difficult to follow the coast accurately) we find it useful to first create and load high‑altitude (~50,000m) low resolution KAPs into OpenCPN. They won't have much detail but they'll be quick to make and they'll show where the coastline and shallows really are. Then you can create accurate route files for GE2KAP to use in making your final detailed KAPs. Another alternative here is to create your routes in GE directly, but GE doesn't move the background chart when your mouse goes to the edge, the way OpenCPN does. Instead, you have to move the chart using the cursor keys, which gets tedious for large routes.
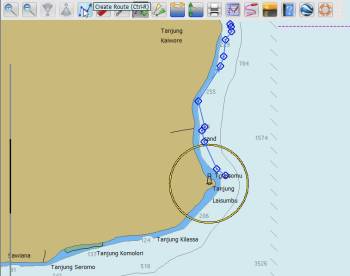 Creating a Route with OpenCPN |
Creating Route Files with OpenCPN:
Route files are very easy to make with OpenCPN. Simply click the Create Route button on the toolbar (looks
like a jagged arrow) or hit ctrl‑R. The cursor will turn into a finely tipped thin pencil. Click
where you want your route to start, and then click the corners of any turns you want your route to make. OpenCPN
will draw a blue line for the route, with diamonds (waypoints) at the corners. Don't worry about small mistakes at this point.
If you want to create a closed route for a group of Area KAPs, make your last click on top of your first
point. OpenCPN will bring up a dialog box asking if you want to use the nearby defined point - click Yes.
Once you've clicked your final point, right‑click in an empty area and select End Route.
Now go back to see if there are any points you'd like repositioned. If so, double‑click on any waypoint to bring up the Waypoint Properties dialog box, move that box out of the way, and you'll find you can drag any errant points to where they belong. If you're going to be making or correcting a lot of route files, you may want to open the Options dialog (wrench button on the toolbar), go to the Advanced tab of the Display options, and uncheck the Lock Waypoints checkbox (about in the middle). This will allow you to move waypoints without having to bring up the Properties dialog box first. But it also means that if you're panning around a chart and you click near a route waypoint, you could end up moving that waypoint instead of the chart. We generally leave the Lock Waypoints box checked unless we're making a lot of routes.
If you're creating a route for dual‑height KAPs, remember to space your waypoints close together where you want detailed, high‑resolution KAPs, and space your waypoints further apart where you only want bigger, high‑altitude, low‑resolution KAPs. Measure the distance of your largest leg in your detailed area and remember that length for when you run GE2KAP.
We like our KAPs to show a bit of land (so we know where it is) and all of the coastal water out to the edge of the Google Fog. This gets us everything of interest along a coast, so most of the routes we make are just offshore of the coast, and follow the coastline. Experience will show you how far offshore to draw your route, and how often to make a waypoint, so experiment with different routes to find what makes KAPs the way you like them. Start out by drawing your routes half way between the land and the edge of the fog, perhaps leaning a bit towards the land.
Once you've finished creating a route file, you should name it right away. Right‑click on a blue line of the route and select Properties. We like to distinguish our GE2KAP routes from our navigational routes, so we end the names with G2K, resulting in a name like Triton Bay N G2K. When GE2KAP creates KAPs from this route, it will use the route name as a base filename for the KAPs and add 5 numerical digits afterwards to make the filenames unique (Triton Bay N G2K_00001.kap, etc).
A new feature in GE2KAP is that you can define the altitude for GE in the Route filename. Simply append _Hxxxx to the route filename, where xxxx is the height in meters. So the above example might become Triton Bay N G2K_H2500.
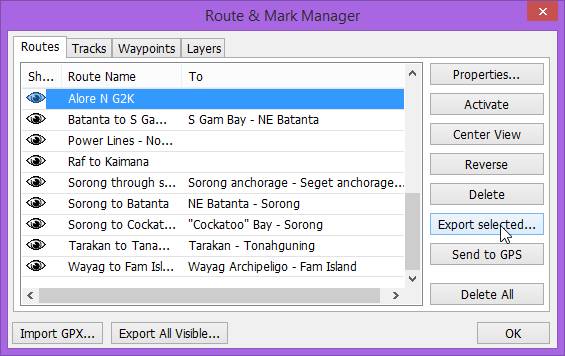 OpenCPN's Route Manager. Cursor points to the Export button. |
At this point, your route is defined in OpenCPN, but other programs can't see it. To save your route file externally so GE2KAP can use it, you need to export it with the Route & Mark Manager (looks like a line‑graph on the toolbar). Make sure you're on the Routes tab, select the route(s) you want to export, and click the Export Selected... button on the right. By default, OpenCPN will offer to save your routes in your Documents folder, but we like to store our GE2KAP routes in a Routes folder under where we've installed GE2KAP and ooRexx (for instance, C:\GE2KAP\Routes\Maldives).
If you select several routes and click Export Selected, OpenCPN will put all the routes into a single GPX file. GE2KAP will process them as a group, with all altitudes the same and all files having the same prefix. Since GE2KAP now supports a batch mode where multiple GPX files can be selected and processed at the same time, we tend to export just 1 route per GPX file.
Folks more familiar with GE or SeaClear can elect to create and export their route files using those programs instead of OpenCPN. As of early 2016, GE2KAP can read route files from OpenCPN (.gpx), GE (.kml or .kmz), or SeaClear (.srw).
Creating KAPs:
Once you've created your first route file for GE2KAP, you should probably try it out to make sure everything is working
as you expect. Once you get more experience and confidence, it's probably easier and faster to create a series of
route files, and then feed them all to GE2KAP.
 All 3 panes of GE2KAP. Cursor shows route-file location. Click for full size. |
Start the GE2KAP.rex program. Starting it will also open a Command (DOS) window for the ooRexx interpreter. This may display some error messages, but can otherwise be ignored. If necessary, expand the GE2KAP window so you can see the 2 left panes (small arrows on the right).
Click the [<<] button to the right of the Polygon/Path: box (top of the middle pane) and navigate to your saved route file(s). GE2KAP now has the wonderful ability to process multiple routes sequentially, so you can select several routes if you want. Click the [>>] button to the right of the Chart Location/Name: box (middle of the right pane) and set it to the folder where you want the KAPs put. Then click the Create Chart button (bottom of the left pane). If GE isn't already running, GE2KAP will start it up and drive it to the center of your first route, at an elevation to see the whole route. Then it will ask you what height(s) you want GE to use (see Imagery Height). For a closed polygon route, only a single height is needed, but for lines, things get a bit more complicated.
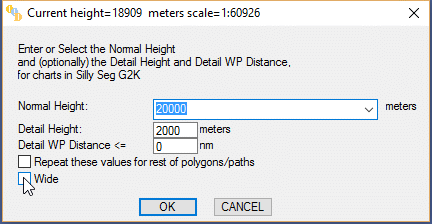 Image Height dialog box - cursor on the Wide checkbox |
Choosing Elevation:
For dual‑height routes, fill in the normal height (in meters), detail height, and the waypoint distance
below which you want GE2KAP to switch to that detail height. If you have multiple routes selected and you want
them all to use the same heights, you can check the Repeat these values... box. Otherwise, GE2KAP will ask the same questions for
each selected route. If you want your Line routes to be just single height, leave the Detail WP Distance at 0 (zero).
Note that if you're doing a batch run that includes both Line and Area routes, if you select Repeat these values..., then the Area height will be the Detail height, not the Normal height. You can override this by specifying the height in the filename (eg, Triton Bay N G2K_H2500) or by specifying the heights individually for each route (not checking the Repeat these values... box).
If you are processing only Area route(s) then you will only be asked to specify one height.
For high‑resolution KAPs, we usually use 2000‑2500m, which gives the maximum resolution GE is capable of with our monitors, but it produces LOTS of relatively small KAPs. For high‑altitude, low‑resolution KAPs, we'll often use 7000m, which catches most of the detail where GE only has low‑resolution imagery.
Wide Lines:
By default, when GE2KAP is processing a Line route, it will take a snapshot, and then move along the line by 1 screen
and take another (and it always takes a snapshot centered on each waypoint). This can result in a fairly thin line
of KAPs, depending on your altitude and screen resolution. If you check the Wide box in the Height dialog, GE2KAP will
go back to an older algorithm where it makes 2‑3 KAPs
before moving along the line. This usually covers from the shore all the way out to the Google Fog, even at low
elevation and maximum resolution. Also, it keeps all the KAPs in a nice grid, with minimal overlaps along the
edges (the newer thin algorithm can produce a hodge‑podge of overlapping KAPs if you zig‑zag your route over an area of
shallows along a coastline). The downside of the older algorithm is that routes with ends further apart than about
60nm can get distortions due to the earth's curvature. That is, the KAPs at the extreme ends of the route will be
correct and usable, but they might not follow your route exactly. The solution, of course, is to break your routes
up into 60nm segments if you want to use the Wide switch. Paul very thoughtfully put this switch back in at our
request, as we much prefer to use the Wide mode for our Lines. If you look in the GE2KAP Help section under
Polygon Path Support / Wide Paths, there's an excellent graphical display of the differences when turning on the Wide switch.
Once you've filled in your height (elevation) information, click OK and GE2KAP will compute how many KAPs it will create, and ask for final confirmation. Once you give that confirmation, it will drive GE to the NE corner of the first route and start making KAPs, working from west to east, and north to south. Performance is largely based on the speed of your internet and your hard drive, but see the section on GE2KAP Performance to see how long this might take. By default, GE2KAP will make a Ta‑DA sound when it finishes.
GE has a silly "feature" where if it finds that it's being driven programmatically for too long, it slows down! Crazy, but it's true. It seems to happen after about 60 KAPs. When GE2KAP detects this slowdown, it will shut GE down and restart it, thus speeding it up again. By default, there's a 30 second delay built into this shutdown, which you can remove by editing GE2KAP's Options.txt file and setting AutoRestart to 0 (zero).
Resuming an Interrupted Session:
A long route or a big area with a low elevation can produce hundreds or even thousands of KAPs, taking several hours.
If you want to interrupt GE2KAP to use the computer for something else, move the cursor to the taskbar. GE2KAP will
suspend its run and bring up a dialog box asking if you want to Terminate the session. Ignore the dialog box and
do your work. When you've finished and you want GE2KAP to resume its run, go back to the dialog box and click the
No button. GE2KAP will then resume the run.
If something crashes and a run gets interrupted without a Terminate dialog, simply restart it, making the exact same answers (height, etc) as the original run. GE2KAP will see that several KAPs already exist, and will ask if you want them overwritten. If you answer No (for all files) then it will resume where it left off.
Storing KAP files:
We find it convenient to put all KAPs for a given area into a folder, and put that folder under a folder for the country (or perhaps
state or province). For instance, we have a GE KAPs folder, and under that we have folders for each country
(Maldives, Malaysia, Indonesia, etc). Under each of those we'll have folders for areas, so under Indonesia we have
Bali, Banda, Kalimantan, Raja Ampat, etc, and under Raja Ampat we have specific areas (Misool, etc).
Don't put too many KAPs in the same folder or you're likely to impact the performance of your nav‑program.
Some countries, like Chagos, are small enough not to need additional folders, as only 230 KAPs are needed for Peros Banos
and Solomon atolls. Once the KAPs are in the folders, it's easy to point your nav‑program at the folder(s) so it can display the KAPs.
Using the Generated KAP files:
Once the KAPs have been generated, you don't need the internet anymore and you can go cruising!
(Ta‑DA!![]() )
But you should probably test the KAPs first to make sure they work correctly. To load the KAPs into OpenCPN,
open the Options toolbox (looks like a wrench on the toolbar) and select Charts. Click the
Add Directory button on the right and navigate to the folder of the KAPs you want to display.
OpenCPN will read all folders below the one you select, so if you select a country's folder, it will read everything for
that country (which may be too many). You can repeat the above to select several folders of KAPs,
but be aware that selecting too many can severely impact performance.
)
But you should probably test the KAPs first to make sure they work correctly. To load the KAPs into OpenCPN,
open the Options toolbox (looks like a wrench on the toolbar) and select Charts. Click the
Add Directory button on the right and navigate to the folder of the KAPs you want to display.
OpenCPN will read all folders below the one you select, so if you select a country's folder, it will read everything for
that country (which may be too many). You can repeat the above to select several folders of KAPs,
but be aware that selecting too many can severely impact performance.
After selecting all the folders you wish to display, click OK (or Apply). OpenCPN will read each file and build a database of where it's to be displayed, which can take a few minutes. If you've left the Show Chart Outlines box checked (under Display, on the General tab of the Options box) then you'll see red outlines for each KAP.
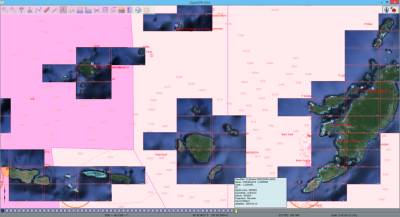 Low-res GE Kaps over CM93 charts in OpenCPN 4.0 Note colored bars at the bottom, with CM93 highlighted. |
As you zoom in to an area where you have KAPs, at the bottom of the display, you'll see a series of colored bars. If you don't see the colored bars, zoom in some more, as you often have to get quite close before they'll appear. These colored bars represent all the different charts that you have loaded for the area you're looking at. If you mouse over them, OpenCPN will display the filename and folder for that chart. Clicking on a colored bar will display the KAPs in that folder. For those folks using the CM93 chart database, it usually displays as a yellow or brown bar to the right of the other bars (see image at right).
Performance Issues:
KAPs are a type of raster chart, so they're very big files for the area they cover. Each KAP file is typically over
1MB. Displaying a lot of them can be
difficult (slow) for nav‑programs. Vector charts, like the CM93 chart database, are much more compact and easier
(faster) for OpenCPN to display. If you notice your nav‑program becoming sluggish as you move around, try shifting back to
your vector charts, and only looking at the KAPs when you really need them, like when you zoom in for details.
If performance issues persist, shut down OpenCPN and try separating your KAPs into smaller groups, and only loading the ones for your
immediate area of interest. Try not to use OpenCPN's Follow Ship mode with lots of raster charts displayed, as that makes the screen
shift every few seconds, which puts a huge load on the display system.
SAS Planet:
GE2KAP now has the ability to use SAS Planet instead of Google Earth, if you want. SAS Planet is a Russian program
that lets you select where you want to get your data from. It has several sources, including Google Earth,
Bing Maps, Yahoo Maps, and even Navionics Charts. This can be handy if, say, Bing has better coverage for where
you want to go than Google. In the Help file, there's a large section on how to use GE2KAP with SAS Planet, so I
won't detail it here. As of early 2016, there were still some issues when using GE2KAP with SAS Planet:
More Info:
Paul Higgins, the author of GE2KAP, has published several
video tutorials for using GE2KAP. These are also accessible from the excellent
GE2KAP Help system, under Tutorials. Terry Sargent, of Valhala fame,
has also published a
GE2KAP Tutorial in PDF form (Terry also sends out an email newsletter with lots of useful information for
cruisers, especially those in SE Asia). In early 2016, Paul started a
Facebook Group where people can ask questions and contribute to solving problems. Finally,
if you have any questions about any information on this page, please don't hesitate to contact us
by email, or you can make a comment on Ocelot's Facebook page.
Equipment Pages:
Cruising Info:
Top Level: Home | Destinations | Cruising Info | Underwater | Boat Guests | Ocelot | Sue | Jon | Amanda | Chris | Site Map | Make a Comment
|
If our information is useful, you can help by making a donation |
Copyright © 2000‑ Contact: Jon and Sue Hacking -- HackingFamily.com, svOcelot.com. All rights reserved.